Friday, May 18, 2012

SmartClose : A Tools To Close All Running Programs In Windows And Then Restore Them Again.

Sometimes, you just have to close all currently running programs, such as before defragmenting or after installing certain software applications. You could manually exit each program one by one, or you could use SmartClose, that will automatically close every running program for you.


SmartClose is a handy tool that allows you to close all currently running programs - a task often required during software installations to minimize conflicts (or during defrag operations). This can be a tedious task when performed manually, and usually requires a restart to get all your programs back up and running. With SmartClose however, the entire process is simplified and automatic, as it stores the running program information in a system snapshot and not only closes all applications for you, but also restarts/restores them later.


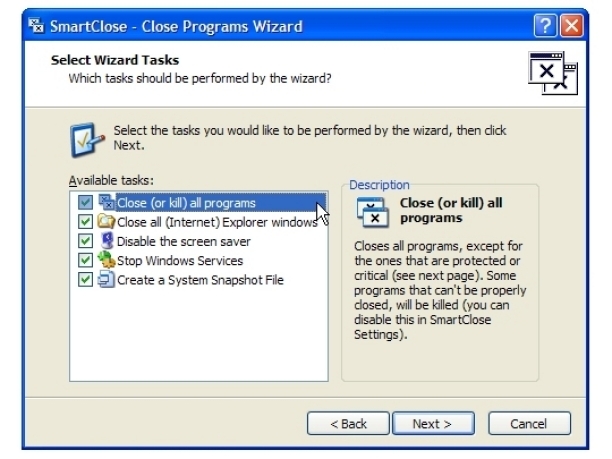
The program can be customized in various aspects, and a quick wizard also allows you to exclude programs from being closed or restored. It will automatically skip applications that are required for the Windows system to run. In addition, it supports services, as well as Explorer and Internet Explorer windows and saves their current location, so they can be restored properly.

Furthermore, SmartClose can perform additional tasks, like disabling the screen saver and the Windows Task Scheduler, and saving the current state of the system, such as all running programs, to a 'system snapshot'. This snapshot can be restored again later by SmartClose, so that all the programs closed by SmartClose will be restarted.

SmartClose features two wizards: the Close Programs wizard for closing all the programs, and the Restore wizard to restore a system snapshot. Both provide an intuitive and clear interface and assist you step by step.

It's deceptively simple, but this application quickly and cleanly closes all programs, and just as easily restores them. SmartClose's five-icon interface smartly uses tooltips to quickly and adequately explain program operation. Intermediate to advanced users will install and operate the program with no further instruction.

SmartClose is a freeware application every user should keep in his or her system toolbox. It's one program you'll turn to often.

Download SmartClose from HERE

PaintStar : A Freeware Image Editing Tool.

PaintStar is a versatile digital image processing software suitable for such tasks as retouching of photographs, composing and authoring images, image morphing, screen capture, and displaying image thumbnail in Windows Explorer context menu. It supports alpha, layer, path ,and the most common editing techniques. PaintStar has many of the tools and filters you would expect to find in commercial offerings, and some interesting extras as well.
 
Using PainStar, you can perform tasks such as retouching photographs, morph images, compose and author images, capture your complete screen irrespective of your set resolution. For a freeware, it supports the most common editing techniques!
 
PaintStar is distributed as freeware. That's right. 100% Free! No cost to you ever. No limitations. No Adware. No Spyware.
 
Minimum System Requirements:
  • Microsoft Windows 95, 98, Me, NT 4.0, 2000, or XP.
  • Memory: 32MB of RAM.
  • 4 MB hard disk space.
  • Video display of at least 256 colours.
  • Mouse or other pointing device
Download PaintStar from HERE

BtProx : A Tool To Lock Windows Workstation Upon Disconnection Of Bluetooth Device

How about locking your system whenever you disconnect your bluetooth device or you go awayleaving your pc ? BtProx or Bluetooth Proximity Lock Utility is a tool with which you don’t need to lock your PC everytime you go away.

This utility is especially useful for those computer users that tend to forget locking their computers’ screens for privacy reason after leaving their desk. And without the need to manually do it, this utility will able to trigger the screen lock by simply relying on common Bluetooth feature found in most of mobile devices and PC in today’s market. Consumed merely 200kB, the utility works great with any Windows Operating Systems and is free for download for extra protection on your proprietary documents.

The locking procedure using this tool is more handy and sensible. The standard locking takes place after a certain time without consideration of where the user is even if the user is sitting in the same room. Infact it’ll lock even if user is reading anything on the computer without ressing any key. Bluetooth Proximity ensures that PC gets locked only if the user leaves the proximity of the computer.

Another benefit of using the Bluetooth Proximity Lock Utility is that it can launch an application if the device gets connected or disconnected from the system.

It can for instance be used to perform an automatic system cleanup, unmount an encrypted hard drive or run a system tool whenever the device status changes.

Download BtProx from HERE

freemypdf.com : A Cool Website To Remove Printing Restrictions and Passwords from PDF Files

Hey my friends, do you have textbooks, ebooks in PDF format? And, unfortunately most of these e-books have restrictions on their pages from being printed, and forget copying any text from the PDF. So, no real studying, with a highlighter and notes in the margins, can ever occur. At least, not without breaking the restrictions on the PDF.


Don't worry a website exists to break all the restrictions from print limits to passwords imposed on PDFs. freemypdf.com is the wesite that does this for you.

First, click the Choose File button and select the PDF from which you want to remove restrictions. Then, click the Do It button. You are then prompted to save the new, free-of-restrictions PDF to your computer. Choose a location for your new file, then open it and use it however you like!


There are a few restrictions for FreeMyPDF.com. First, you must be able to view the PDF without entering a password for it to help you.

Second, there is a file size limit of 7MB. Finally, they ask that you not use the site to do anything illegal. They do not elaborate on what they define as illegal (or immoral), but they do not take any responsibility for your PDF-freeing activities.

Visit The Website HERE

How to Disable and Turn Off Aero Peek at Desktop in Windows 7 ?

Whenever there is Aero enabled in Windows 7, the Aero Peek feature which we know as Desktop Preview, will be enabled and turned on. When the open windows are hidden, only outlines or borders of all windows are shown, allowing users to peek behind all open windows to see the desktop. 
 
For Windows 7 users who don’t need the Aero Peek feature, here’s how to disable and turn off Aero Peek. 
  • Right click on blank space on Taskbar, and click Properties.
  • In the “Taskbar and Start Menu Properties” dialog, make sure that Taskbar tab is selected.
  • Uncheck or untick the Use Aero Peek to preview the desktop option.
  • Click OK or Apply.
 It’s also possible to turn off and turn on Aero Peek via Show Desktop button bar: 
  • Right click on the Show Desktop small rectangle button on the far right end of the Windows 7 Taskbar.
  • Click on Peek at desktop option on the context menu so that the tick next to it disappears to disable Aero Peek.
  • Alternatively, follow these steps:
  • Go to Control Panel -> System and Security -> System, and click on Advanced system settings link on the left pane.
  • In “System Properties” dialog box, make sure it’s on Advanced tab.
  • Click on Settings button under Performance section.
  • In “Performance Options” dialog box, make sure it’s on Visual Effects tab.
  • Untick and uncheck the Enable Aero Peek option. 

Note: System will automatically select “Custom” radio button, if the advanced configuration has never been customized before.
  • Click OK or Apply.

Close All : A tool to close all running applications with just a single click

Close All lets you close all running applications with just a single click. It doesn’t use system resources because it only flashes a ‘close’ signal to all open applications on the desktop and then ceases. Just create a shortcut to the tool in the Start Menu, Quick Launch, Windows 7 Taskbar or elsewhere.

                                                   Close All on Windows XP Quick Launch

                                                   Close All on Windows 7 Taskbar/Superbar

You can always add a hotkey to this shortcut. It is really very handy if you are running ~20 applications and want them all to quit instantly. It works just as if you were pressing the close button for each application.

How To Install ?
Close All Windows is a very simple utility that doesn’t require installation. No settings are stored in the Windows Registry or file system. Just follow the steps below to set it up on your computer.

Download the ZIP archive from the link given below and extract it somewhere on your hard drive.

Open the extracted folder, right-click CloseAll.exe and choose Send To -> Desktop (create shortcut) from the context menu.

Switch to the Desktop and rename the created shortcut to “Close All” or whatever you want.

Now you can drag this shortcut to the Quick Launch Bar or to the Windows 7 Taskbar for quick access.
Download Close All from HERE

Digito : A Tool To Resize, Rename and Convert Pictures Images In Bulk

Sometimes you may want to rename the filename of all the image files so that it appears meaningful and easy to remember. Besides, you may also be interested to convert the file formats from one to another with customized resolution and image quality for optimized hard disk space. Now with this tiny utility named as Digito, it will simplify all the hassle needed by batch processing the required image files in simple steps with full customization.


Digito is a free open source (currently in beta version) utility and compatible to run with any Windows OS, it is a simple-to-use buy yet useful image processing utility suitable for all usages.


Download Digito from HERE

SyncSharp : A Tool That Synchronize Two Computers Through A USB Device

So if you are willing to synchronize your important data between your computers, I am providing you the solution. Most of the synchronization programs out there synchronize data online through internet or a local network connection. But if you want to synchronize data between two computers via your USB drive or your pocket hard drive then SyncSharp is the perfect choice for you.
SyncSharp is a free synchronization tool written in .NET C# that synchronizes files between multiple computers through a USB device. Moreover, it does not require installation and it is easy to use.
The interface of the application is user friendly and simple allowing users to create multiple synchronization tasks and to run them separately whenever desired.
An analysis of the synchronization tasks that is selected may be performed, the application displaying the files and folders that would be copied in the synchronization process for the users to preview the results of the job.
Features:
  • Create, edit and delete synchronization profiles
  • Import/export synchronization profiles
  • Configure settings for files conflicts
  • Synchronize source and target folders contents
  • Preview a synchronization task
  • Configure inclusion/exclusion filters
  • Backup files in source to target folder
  • Restore a previously backup task
  • Generate log file after each synchronization operation


Benefits:
Clean: SyncSharp does not save any extra files in your sync folders. All meta-data files and profiles are kept in one centralized location. No installation required. No dependencies (No need to install additional components). No admin rights are required to run our application. Takes up minimal disk space. It requires less space than a typical digital photo (i.e., less than 0.5Mb).

Automated: SyncSharp will help you to synchronize all folder pairs automatically when the USB device is plugged in. No extra steps are required!

Fast: Our synchronization algorithm will be able to detect files deletion, renames, creation and modification accurately. SyncSharp performs sync actions efficiently by reducing unnecessary copy or delete actions.

Free: No restrictions (you can use it on any number of computers to synchronize any number of files). Free for both commercial and non-commercial use. Open source.
System Requirements
Microsoft Windows 2000/2003/XP/Vista/7
128MB RAM or more
.NET Framework 3.0 or higher installed
Auto-play feature enabled (Disabled in Windows 7 by default)
Download SyncSharp from HERE

PenyuUSB : A Tool To Password Protect USB Mass Storage Ports

USB flash drives are useful for data portability but also dangerous at the same time. It is one of the most common method of virus spreading and also the threat of stealing confidential data on corporate companies. If there are no reason to use a USB flash drive, it would be best to disable it to prevent from future damages that it can cause. One of the easy yet troublesome way to disable USB mass storage devices such as flash drives and external hard drive is by using PenyuUSB.


PenyuUSB is an easy to use application that was designed in order to help you protect USB storage drives. After installation, you will first need to activate the program for free by providing your name and email address. Then the developer of PenyuUSB will send the activation code for you to activate the software. The Execute button will be grayed out if you do not activate the software.

Only those authorised with password can manage the USB mass storage. The administrator can regularly change the password if necessary.

This software can also be used to prevent data from being stolen using pen-drive.

Once activated, the Execute button will be enabled and you can restrict USB storage devices by selecting Disable USB and then click on the Execute button. You can also set a password on PenyuUSB so that unauthorized users can’t use this application to re-enable the USB. The restriction takes effect immediately without rebooting the computer. If you check the device manager while the USB is plugged in and disabled by PenyuUSB, you will see a yellow exclamation icon with the message “A driver (service) for this device has been disabled. An alternate driver may be providing this functionality. (Code 32)”. This means that PenyuUSB has successfully disabled the USB mass storage device.


NOTE: Free registration is required to receive activation code.

Download PenyuUSB from HERE

Extended File Details : A Tool To See Detailed Properties Of A File

Windows gives an option to see the properties of a file by right clicking on the file and going to Properties. These properties are very limited in the sense that not everything about the file is shown in one dialog box. Sometimes we need to check the properties of a file to see a specific property like the file size, date modified or date created or if the file is read only.


The Extended File Details application was developed to be a free and portable tool to display and save file properties.

It can display and save to a text file:
- File Name
- File Type
- File Size
- File Version
- File Attributes
- File MD5
- File CRC
- Company Name
- Description
- Legal Copyright
- Legal Trademark
- Language
- Comments
- Date Created
- Last Accessed
- Last Modified
- Internal File Name
- Original File Name
- Large and small icons

Using EFD is very simple, you need to provide only on information which is the file path and name, this can be done by on of the following ways:
- Drag and Drop a file on the EFD.EXE icon
- Drag and Drop a file on the EFD main aplication form
- Browse and select a file
- Type the full path and file name
- From the command line type EFD.EXE FileName.Ext

Now you can view the file details and can save this information to a text file.

Download Extended File Details from HERE

Network Information Center

The Network Information Center is a program through which you can get information about the network that is connected to your computer and connect to the internet. More specifically, given the following information:

External IP Address: The IP address of your Internet
Internal IP Address: Internal IP address (the network)
Default Gateway : The IP address of Router you are connected
Address physical (MAC) : The unique physical address (MAC) network card
Network Interface Card: Information about the network card


It is also possible PING a remote computer in order to determine if it is connected to the internet. Network Information Center is also helpful in some troubleshooting tasks as it gives an option to ping an IP address or website. It runs on 32-bit and 64-bit Windows.

Download Network Information Center from HERE

Access Control Changer : A Tool That Take Full control of Files & Folders

We have come across access denied errors when we try to access files or folders from one user account to the other on the same system or, when permissions for the folders are set set to disallow you to open some files or folders.

We often create different user accounts on our system, but receiving such errors can be quiet annoying at times when it is urgent to access important file or folder. You are left helpless, googling for the solution and google coming up with list of spammed software solutions that are either useless or you will need to pay to use them. Same thing happened to me after which i discovered a freeware named Access Control Changer.


In addition to using the software archiver, security files can also be done by changing the access control user properties to the file / folder, this method will be applied to this application (Access Control Changer). You can apply the five attributes of access rights to the film / folders you want to:

None => In order to completely prohibit user access to files / folders
Read => For only allows read access rights to the file / folder
Write => To only allow write access to the file / folder
Change => To only allow to change file / folder
Full Control => To allow all the permissions on files / folders


Download Access Control Changer from HERE

Universal Viewer : An Advanced File Viewer

Universal Viewer is an advanced file viewer with wide range of formats supported. Implemented view modes and corresponding file formats are:
  • Text, Binary, Hex, Unicode: any files, of unlimited size (even 4Gb+ sizes are allowed)
  • RTF, UTF-8: RTF and UTF-8 encoded texts
  • Image: all general graphics formats: BMP JPG GIF PNG TGA TIFF... plus all formats supported by IrfanView/XnView external viewers
  • Multimedia: all formats supported by MS Windows Media Player: AVI MPG WMV MP3...
  • Internet: all formats supported by MS Internet Explorer: HTML PDF XML MHT...
  • Plugins: all formats supported by Total Commander Lister plugins
  • MS Office: all file types of MS Office (if installed): DOC DOCX XLS PPT...
  • Converters: some types can be viewed as plain text: DOC DOCX PDF PPT ODT...
Application is fully Unicode-compatible and can be integrated into Windows Explorer's context menu, so there is no problem to call it from anywhere in Explorer: right-click a file and select the "Universal Viewer" item. It can also be integrated into other popular file managers.
 
 
Generally, Universal Viewer is an application similar to Total Commander Lister. But comparing to Lister, it has the following highlights:
  • Built-in functions of several plugins: images, multimedia, webpages view
  • Support for multiple codepages: ANSI, OEM, EBCDIC, ISO etc.
  • Support for text converters for DOC, DOCX, ODT, PDF etc.
  • Support for user tools
  • Toolbar, status bar, other interface improvements
  • Auto-reloading of file on changing, "Follow tail" option
  • Displaying of line numbers
  • Displaying of non-printable characters
  • Combined Unicode/Hex mode (call Unicode mode twice)
  • Modern RegEx search library
  • Print preview
  • EXIF viewer
In the Lister plugins section you will find the list of rather good Lister plugins to use in conjunction with UV. These plugins are developed by 3rd parties and are not included into UV installation.
 
 
License:
  • the main application is freeware;
  • the add-on "Navigation Panel" is shareware.
The "Navigation Panel" add-on is used for the following purposes:
  • showing Explorer-like window;
  • commands "Delete", "Copy to folder", "Move to folder", "Rename", "Send by email";
  • running user-defined tools;
  • running text converter for Office files;
  • registering of MS Office control (note: when NavPanel trial period will expire, program won't display MS Office files anymore).
System requirements: Windows All (32-bit)

Download Universal Viewer from HERE

How To Disable Annoying Administrator Privileges Prompt in Windows 7

Many times you may have encountered the prompt for administrator privileges in Windows 7.


There is technique by which you can set the administrator privileges by default in Windows 7.

1. Go to Start –> Computer and right click ,select Manage.
2. Double click Users and Groups,select Users, click Administrator and open its Properties by right click


3. In General tab,uncheck Account is disable,then click Apply and OK.


4. Delete other users in this group.


You are done! Now Windows 7 will not asking need administrator privileges.

GrabOut : A Website That Capture and Upload Screenshots

GrabOut is a light and easy-to-use screenshot capture program that allows you to capture you screen or a part of it and then automatically uploads it to the GrabOut server. You will then be provided with a link that you can use to show the screenshot to your friends. This application let's you grab (capture) a piece of your screen. The image is then automatically uploaded to the GrabOut™ server by the application and it instantly returns a URL for you to quickly share the image with your friends.

Open the downloaded file and follow the installation instructions. Once finished, you will be presented with this screen:


To grab a section of the screen, click on the green Grab now button. Then choose a section of the screen that you want to grab or capture. The program will return a white screen with a message that tells you to wait for a moment as the program uploads the captured part of the screen. After a few seconds, the ‘Grab now’ message on the user interface will be replaced by a URL. Click on the Go button and you will be taken to the capture’s GrabOut page.

GrabOut is a free software that is less than 500k in size. The program is convenient to use but it is rather limited in features. For one, it is more difficult to capture precisely what you want without a zoom feature that allows you to magnify the points where you want to start and end the capture. It is easy to get something that you might not have intended to capture.

Visit GrabOut HERE

Download GrabOut from HERE

How To Enable Windows 7 Check Boxes ?

Windows 7 allows you to select files in Windows Explorer using check boxes. Simply select the files you want by selecting a check box next to each file. You do not need to use the Ctrl key.


Start by navigating to the folder containing the files you want to select. Then, select Folder Options from the Tools menu.


The Folder Options dialog box displays. Click on the View tab and scroll down under Advanced settings until you find the Use check boxes to select items option. Select the check box next to that item to turn it on. Click Apply and then click OK.


Now when you put your mouse over a filename, a check box displays to the left of the filename. To select that file, select the check box.


Now you don’t have to worry about accidentally letting up on the Ctrl key while selecting your files and having to start selecting them all over. Any files you select using a check box stay selected unless you click the check box to unselect the file.

Merge MP3 : A Tool That Merge MP3 Files

Merging several mp3 files into one has many benefits. It can continuously play your favorite songs with just a click of a button, save disk space, and manage all your mp3 collections better. There are many great programs to achieve this, but very few of them are actually free.

 
Merge MP3 is a utility to merge multiple MP3 files into one long MP3 file. Intuitive user interface and high merge speed combined with absolutely free license and single-executable installation (no complicated installers / uninstallers - uncompress and run from any directory) make this tool a perfect addition to your audio management utilities collection.

 
Program Features:
The features of the program are not numerous - but everything you need is here:
  • Merge as many files as you like - no limitations by size, length, or number.
  • Sort files to be merged by filename (with or without directory), date/time or size.
  • Optionally write ID3v1 and ID3v2 tags into the merged MP3 file.
  • Optionally write VBR frame into the merged file - useful when merging files with different bitrates.
  • View detailed information about MP3 files to be merged, including MPEG header information and ID3v1 and ID3v2 information.
  • Choose to use ID3 tag from any of the files to be merged to write into the target file.
  • Display an image embedded into the MP3 files.
  • Play MP3 files from the list to be merged.
  • No complicated installation - simply unzip the program and run from any directory.
  • Very intuitive interface.
  • Very fast merge speed.
  • It's absolutely FREE!
Download Merge MP3 from HERE

USB Safeguard : A Tool To Secure Your Files in USB

USB Safeguard enables you to encrypt and password protect sensitive data on your USB drive. You can selected one or more folders to be encrypted and choose to securely delete the original (unencrypted) files with the built-in file shredder. The program also includes a handy Safe Browsing feature that allows you to launch Internet Explorer without leaving any Internet traces on the host computer. Other features include an on-screen keyboard for secure password input and free space wiping. USB Safeguard uses 256-bit AES encryption to protect your date. The program is not installed on your PC, it runs directly from your USB pen drive.


Just simply drag and drop files and folders to quickly protect your sensitive documents, and then enter an password to encrypt and decrypt the files that you want to protect from prying eyes. Not only encrypts your files, it also has 'Safe Internet Browsing' option to surf safe on web and removes all Internet traces like URL history, typed URLs, typed passwords in web forms and etc. Built in file shredder, i.e. wiping the contents of the original pre-encrypted file. Your data is secure while the drive it is out and about with you in an Internet cafe's or at work. Supports FAT16, FAT32 and NTFS file system

Download USB Safeguard from HERE

Hooker : An Application That Record or Track Keys Press Action On Keyboard

Hooker is a lightweight keyboard spy. It is a software by Denis Kozlov released as a Freeware. Hooker runs on Windows 9X/ME/2K/XP/2003. However public version has several limitations like program shows it-self when started; stealth mode is deactivated when hot key is pressed (without password prompt).

 
Some of the features:
  • stealth mode,
  • log encryption,
  • capturing of clipboard changes and currently used process,
  • log viewer.

As this program records the key press action, it might get reported as malware, spyware but it does not send the recorded data to anywhere including author. This application works on all the windows operating system including windows 7, we have just tested it on windows 7 32 bit Ultimate Edition
 
Limitations:
Hooker shows it-self when started; Stealth mode deactivated when HotKey is pressed (without entering a password, because there is no Password for Public version).
 
Download Hooker from HERE

Steel Keylogger : A Tool That Secretly Record Computer Keystrokes

Steel Keylogger is a keylogger that is virtually invisible to all the common anti-virus software today, helping you keep it running stealthily. Also, it does not connect to the Internet so your data is safe.
This program is a simple one and has no Web site, but the file is widely available on most torrent sites. Just search for Steel Keylogger and download the file. The downloaded program will include two files that are under 40 kilobytes, which makes the keylogger not only functional, safe but also small in size.
There is no need to install Steel Keylogger onto your own system, thereby bypassing another concern most people have keyloggers: the inability to uninstall them. To start using the application, right click on the Steel.exe file and choose Run as administrator.

Allow the process to run, this would launch the Steel Keylogger program.

The Steel Keylogger interface is as simple as it gets. The interface has the following four partitions:
  • a Log Window that shows the keystrokes for the last 30 seconds,
  • an option to Hide or Stop the program,
  • a tickbox to enable or disable logging the contents of the clipboard,
  • a status window.
To make full use of the Steel Keylogger program, click on Options and then click on both Auto Startup and Hide on Startup. You could specify where you would want the program to save logs by clicking on Save Location.
Each time your computer is booted up, the Steel Keylogger application is activated and hidden from view, making the user unaware that all of his or her keystrokes are being recorded. You could come on later and view the logs using Notepad and check on what the user has been doing on your computer while you were away.
To call up the interface, use the combination CTRL + SHIFT + F8.
Download Steel Keylogger from HERE

Nepali Unicode for Windows 7

The inbuilt support for Nepali language input was started from Windows Vista onwards, and now it’s continued in Windows 7 too, while back to XP age people had to use other Unicode Converter tools to use Nepali Unicode in Windows. The use of On-Screen Keyboard makes the use of Nepali Language as a primary or just an input language easy in Windows 7.

While the Nepali version of Windows 7 (Windows 7 Nepali Language Interface Pack LIP) has not yet been released by Microsoft Nepal (Unlimited Technologies) in which Nepali would be the default operating language of choice, we can still use Nepali language keyboard in Windows 7 having other OS languages. So let us start installing and activating Nepali Unicode System.

I am assuming that you all have downloaded the unicode software package. So shall we start??

Go to the Control Panel >> Region and Language Settings

On Region and Language wizard select Keyboards and Languages tab.

To change your keyboard or input language to Nepali, click Change Keyboards, you should see the Text Services and Input Languages screen.

Click Add to install Nepali Language in Windows 7. (check on the Default input language drop down menu if it has been already enabled)

Now, on Add Input Language box select Nepali (Nepal) >> Keyboard Nepali, and Ink Correction (optional – leave it unchecked if you don’t want it) and click OK.

Now you shall be taken to Text Services and Input Languages screen again where you should apply the settings. Click OK and you are ready with Nepali (Nepal) Keyboard in Windows 7.

To get started with Nepali Keyboard, select the NE (Nepali – Nepal) from the Language bar near the hidden icons or Action Centers at right corner of the Taskbar.

You can select the language whenever you want, eg writing emails in Nepali, or updating your Facebook profile in Nepali or even searching Google in Nepali language. But you might not get a search result if you enter सहयता in Search Help box of Windows Help and Support center. So, I strongly recommend you to learn to use Nepali Unicode keystrokes before you make Nepali as the default input language in Windows 7.

In Short, follow these steps:
1. go to "control panel"
2. click on "Clock, Language & Region"
3. click on "Region & Language"
4. go to "Keyboards and Languages"
5. Click on "Change Keyboards"
6. Click on "Add"
7. Then Select "Nepali(Nepal)"
8. Then Check on "Nepali"
8. Then Click "OK"

See these articles too:

How to install nepali unicode in windows vista ? CLICK HERE

How to type with Nepali Unicode Upgraded Keyboard Layouts ? CLICK HERE

Source: techsansar.com