Showing posts with label USB. Show all posts

Tuesday, June 12, 2012

PenyuUSB : A Tool That Disable USB Mass Storage To Protect Your Windows PC

While USB drives are one of the most useful devices when it comes to data exchange, they are also a pain in terms of spreading viruses and data theft. This is especially problematic in college or office labs, where students or workers frequently exchange thumb-drives and use them on unprotected systems. One infected drive and the administrator has to spend hours of maintenance work on all networked PCs.


While it may not be possible to control the users’ behavior, it is very easy to control how your PC behaves. PenyuUSB is free software that allows you to disable or enable USB mass storage controller, hence preventing the drive from accessing the PC altogether. PenyuUSB is an easy to use application that was designed in order to help you protect USB storage drives.

It doesn’t mean that the USB will be blocked for everyone, the only exception being the people having the password required to access. This software can also be used to prevent data from being stolen using pen-drive. Only those authorised with password can manage the USB mass storage. The administrator can regularly change the password if necessary.

This software can also be used to prevent data from being stolen using pen-drive.

While this solution may not appeal to some users, you can always enable the USB function back, which can be password protected. The administrator can then share the password with authorized users. Using PenyuUSB, you can also prevent data theft.

NOTE: Free registration is required to receive activation code.

While very useful, this tool comes with a little bit of complication. Despite being free, it requires registration top activate the program. When unregistered, you have an ‘Enter Activation Code’ button available at the bottom of the screen. Clicking it will bring forth a dialog box where the unique registration number for your PC can be found.


Enter the required info and click the Send Online button. It will be received by the software’s developers, who will send you back your activation code. Also note that you will need to disable Windows User Account Control (UAC) in order to use this utility. Probably quite a serious drawback for some users.

Aside from this minor inconvenience, PenyuUSB can be really helpful in protecting your PC and data by safeguarding your system’s USB ports. It has been tested with Windows 7 32-bit and works well.

Here are some key features of "PenyuUSB":
· To enable and disable USB mass storage to avoid unauthorised use
· To avoid stolen of sensitive company data
· Password protected

The tool is free and simple to use. It can be downloaded easily from the link below.

Download PenyuUSB

Monday, June 11, 2012

Smart Virus Remover : A Solution To Pen Drive Icon Looking Like A Folder

Few days back one of my friend came across a trouble with his pen drive. When he connected the pen drive into the computer's USB port, the icon of the drive looked like a folder rather than a drive. Obviously it was a virus problem. I scanned it with Avira. But it could not find any infection though it was up to date. Then I tried this tool called "Smart Virus Remover". It scanned the drive and deleted the autorun.inf file. Then the icon was changed.


So if ever you face such problem then you may try the above. Download and Install it & click on delete autorun.inf files. Your drive will be scanned and Smart Virus Remover will delete the aurorun.inf file from it. Once you have done. Just unplug the usb drive and reconnect it. Sometimes you may need to restart the computer. You will see your icon restored.


Alternative Approach:
Start –> Run –> cmd -> ok

Type below:
attrib -a -h -r -s PenDriveNameautorun.inf
del PenDriveNameautorun.inf

eg.
attrib -a -h -r -s h:autorun.inf
del h:autorun.inf

Hope it should solve the problem.

How to Manually Remove Virus From USB Flash Drive without Formatting?

While installing a new software, while downloading a file from the internet , while plugging a USB device , while opening a malicious website and adding numerous other while's ...what we fear the most is --"does it have a virus"?

Most of the active viruses infect your windows system as soon as you double click on the Pen Drive icon in your my computer. As virus always creates a autorun.inf file which is a system ,hidden and a read only file on your pen drive. It point to the main virus file which is also located on the pen drive. When user double clicks on the pen drive files pointed by the autorun.inf got executed which copies the virus files on your system.

How To Know There Is Virus?

1. When you plugin a drive, Some Autoplay feature polls you to select a option. If you see a folder like icon that reads open using the program provided on the device. Does not select that. Also do not select Open folder to view files using Windows Explorer. Since the virus can execute with these options. Cancel it.

Note: Windows 7 has disabled the Autorun Option for Flash Drives, since the autorun source is usually unknown.

2. You will also see a folder like icon instead of Flash Drive Icon in my computer

How To Remove Virus Manually?

1. In Start Menu Click RUN and then type cmd. Type your Flash Drive Letter followed with colon. For eg:

J:

type attrib -r -a -s -h *.* and press enter.

This will unhide all files.

2. Correct Way of Opening Flash Drives
Do not open the Flash Drive by double clicking the icon in my Computer or By Right clicking and then Open,Explorer. Open the USB Drive by using Folders Icon. Click on the Folders icon then select your Flash Drive.

OR

You can select Your Flash Drive by using the Address Bar in Windows Explorer.

OR

Type your Drive letter in the Address Bar.

3. After Opening the drive. Select Details View.

You can now see what the virus does with your Flash Drive. The Virus does disguises itself as folder. You can see that system file icon as illustrated here is similar to folder icon. You actually click on the file.

Actually you click on those virus file thinking of them as folder and the virus executes. In the detailed view you can clearly see that the system file has a Type description of Application and the system folder has a Type description of Folder.

Delete all such files. Carefully do not delete the folders.

4. Delete the Autorun.inf file

5. You can also delete these files using 7-ZIP. Since it shows such virus files as having application file icon.

Download 7-ZIP from HERE

Or you can get PowerExes Pack that includes it.

Download PowerExes Extra Pack from HERE.

Open 7-ZIP and Type your Flash Drive Letter in the Address Bar. Here J:

6. Delete all the folders and files you think that you did not saved them.

The folders could have names like Recycler,System Volume. Delete them also. You can also see the Recycle Bin like icons delete them too. In this illustration these files are virus files:  0o.com, system.exe, 2m66sr.exe, abk.bat, etc.
7. Now Scan your Flash Drive with some Anti-Virus to delete exe infecting viruses. This is because some application files (which can be some programs like Adobe Reader Setup or else) be affected with exe virus.

If you do not have a proper Anti-Virus then Click on Search and select All files and Folders. In the All or part of file name field type *.exe. In the Look In field select Your Flash Drive. In the More Advanced options select Search System Folders and Search Hidden files and Folders. When search is complete delete all files.

Friday, May 18, 2012

PenyuUSB : A Tool To Password Protect USB Mass Storage Ports

USB flash drives are useful for data portability but also dangerous at the same time. It is one of the most common method of virus spreading and also the threat of stealing confidential data on corporate companies. If there are no reason to use a USB flash drive, it would be best to disable it to prevent from future damages that it can cause. One of the easy yet troublesome way to disable USB mass storage devices such as flash drives and external hard drive is by using PenyuUSB.


PenyuUSB is an easy to use application that was designed in order to help you protect USB storage drives. After installation, you will first need to activate the program for free by providing your name and email address. Then the developer of PenyuUSB will send the activation code for you to activate the software. The Execute button will be grayed out if you do not activate the software.

Only those authorised with password can manage the USB mass storage. The administrator can regularly change the password if necessary.

This software can also be used to prevent data from being stolen using pen-drive.

Once activated, the Execute button will be enabled and you can restrict USB storage devices by selecting Disable USB and then click on the Execute button. You can also set a password on PenyuUSB so that unauthorized users can’t use this application to re-enable the USB. The restriction takes effect immediately without rebooting the computer. If you check the device manager while the USB is plugged in and disabled by PenyuUSB, you will see a yellow exclamation icon with the message “A driver (service) for this device has been disabled. An alternate driver may be providing this functionality. (Code 32)”. This means that PenyuUSB has successfully disabled the USB mass storage device.


NOTE: Free registration is required to receive activation code.

Download PenyuUSB from HERE

USB Safeguard : A Tool To Secure Your Files in USB

USB Safeguard enables you to encrypt and password protect sensitive data on your USB drive. You can selected one or more folders to be encrypted and choose to securely delete the original (unencrypted) files with the built-in file shredder. The program also includes a handy Safe Browsing feature that allows you to launch Internet Explorer without leaving any Internet traces on the host computer. Other features include an on-screen keyboard for secure password input and free space wiping. USB Safeguard uses 256-bit AES encryption to protect your date. The program is not installed on your PC, it runs directly from your USB pen drive.


Just simply drag and drop files and folders to quickly protect your sensitive documents, and then enter an password to encrypt and decrypt the files that you want to protect from prying eyes. Not only encrypts your files, it also has 'Safe Internet Browsing' option to surf safe on web and removes all Internet traces like URL history, typed URLs, typed passwords in web forms and etc. Built in file shredder, i.e. wiping the contents of the original pre-encrypted file. Your data is secure while the drive it is out and about with you in an Internet cafe's or at work. Supports FAT16, FAT32 and NTFS file system

Download USB Safeguard from HERE

Tuesday, May 15, 2012

USB Drive Fresher : A Tool That AutoCleans Your USB Drive On Plugging It Everytime


Every time you use your USB drive in a different computer you might see some little files/folders on your drive like thumbs.db, or .Trashes folder, or .Spotlight-V100, or the ones with the underscore at the start of the name. Your computer and others may automatically place files on your USB drive every time you use it. Now you can keep it clear and clean just as automatically – using rules you set up and approve. Today I share how you can take the last the possible step of protection, ie., auto cleaning the USB on inserting the drive in the system everytime.


Using USBDrive Fresher you'll never see those files again. USB Drive Fresher can remove unwanted files automatically and according to rules you specify also.Just set it up once and everytime you insert it will auto clean your usb drives.

USBDriveFresher key features:
  • Customizable cleanup patterns
  • Predefined patterns
  • Cleanup USB drive with a mouse click
  • Autocleanup USB drive when it is plugged in
  • Folder cleanup
  • It's FREE!
Download USB Drive Fresher from HERE

Friday, May 11, 2012

USBFlashCopy : A Utility Tool To Backup Your Flash Drives


USBFlashCopy is a small Windows utility to back up your flash drives and storage cards on the fly. It runs in the background and copies files from inserted media to a safe location on your hard drive.

Simply plug in the media and use it as usual, USB Flash Copy automatically backups your data in the background. Destination folders are created automatically, but you can define profiles to assign copy options to particular flash sticks or cards. Full version features silent mode to remove popups, prompts or any visibility at all.

The first time you connect a drive, the software will ask if you want to create a backup profile, at which point you can choose where to store the backup, files to ignore (if any) and how to process modified files (overwrite or save a copy). USBFlashCopy uses the drive's serial number to identify the drive and will automatically run the configured profile the next time you connect it. To speed up the backup process, only newer or update files are included in subsequent backups, saving you time and unnecessary copying.

USBFlashCopy is a really small utility taking no more than 300KB of space, it doesn't require additional libraries, frameworks or anything else to download and install. It is free for non-commercial use. You would need an unlock key to use Silent Mode.

Download USBFlashCopy from Here

Source: usbflashcopy.com

USB Protector : A tool That Removes Autorun Viruses from USB Drives

Virus!! Virus!! Virus!! The most common problem that we are facing today with our Windows based systems.

Despite of the virus attacks from WWW, we are facing threats from local hardware like USB, Pen drives and so on..It’s the right time to safeguard your hardware devices in a effective way. And one of the great solutions is USB protector.


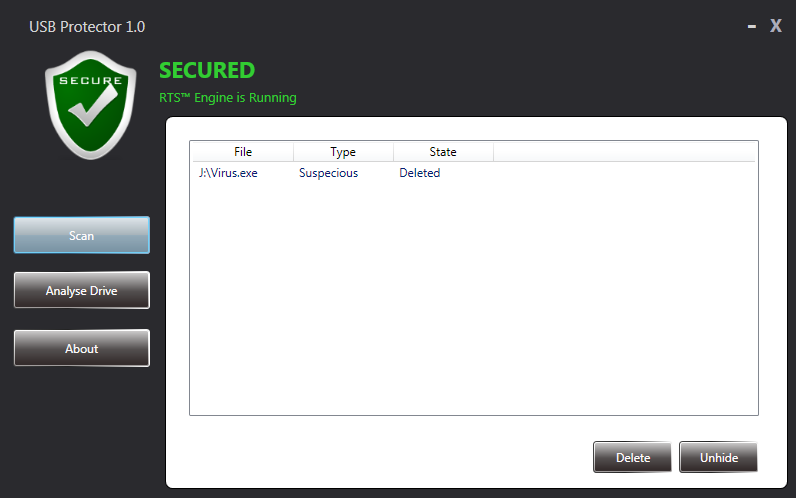
USB protector is a small tool developed in .Net 3.0 to prevent malware infections through USB Removable Storge Drives. It can detect and eliminate malwares automatically And provides a full scan of the drive to find hidden files.

USB Protector provides a Realtime Scanning mechanism (RTS) so that malwares are detected on time when a removable storage drive is attached. Once you install USB Protector it will be automatically added to startup list so it can run every time windows reboot. The UI of USB Protector is not cluttered with many options and provides minimum required options such as Scan and Analyse Drive.

If you have already connected removable USB storage device to PC you can just hit scan option to initiate USB drive scanning. USB protector will list any autorun or infected files are found in USB. USB protector is still in beta mode and final version is yet to be released. USB Protector supports Windows XP, Vista & Windows 7. It is very tiny and takes less memory.

NOTE: .Net framework 3.0 or higher must be installed on your system to run USB Protector.

Download USB Protector from Here

Source: ajeeshms.web.officelive.com

HOW TO FORMAT A WRITE PROTECT USB DRIVE?


What is Write Protected error and why it happens?
This seems to be the problem of most of us these days and some of our readers who wanted to know the methods how they can remove the Write Protected error from their USB drives like Pen Drives and memory cards. In the Write Protected error, we can’t write or copy any data in our flash drives and even can’t format the drive. There are many reasons that cause this problem, let’s see solutions of them.

Solution 1:
To format a write protected USB flash drive, you must first unprotect it. Most USB flash drives have a tiny switch somewhere around it's casing. You will have to look at it closely because it is sometimes placed where you won't notice it. If your computer says it is write protected, just unplug your flash drive, move the switch to the other end and plug it in again. You will now be able to format it.

Solution 2:
Delete and re-partition the USB drive, using Windows XP. Go to "Control Panel," "Administrative Tools" and "Disk Management." Select the USB drive and click "Delete." Right-click on the empty drive and select "New Partition."

Solution 3:
Just download this helpful software from Here and run it to execute a “low-level format” on the drive. This software is quite handy and may take few attempts to actually remove the error.

After the low level format, you may need to “Partition the drive“. Dont worry, partitioning a pen drive means allocating it its File System and Cluster Size that was lost after the Low Level Format.

Follow this Method:

Run diskmgmt.msc in Run.
In the disk management window, select the pen drive, right click on it and click on Format.
Now choose the File System and Allocation Unit Size and do not check the boxes below.

Click OK and the drive will be reusable after this.

Solution 4:
This happens when some virus or script which applies the registry hack to make any drive write protect when connected to the computer, In that case follow the procedure below to remove write protection from your pen drive.

1. Open Start Menu >> Run, type regedit and press Enter, this will open the registry editor.

2. Navigate to the following path: HKEY_LOCAL_MACHINE\SYSTEM\CurrentControlSet\Control\StorageDevicePolicies

Note: If the registry key StorageDevicePolicies key does not exist, you will need to create it

Download this batch file called add.bat from here Download, and double click after download the key will be automatically added to registry.

3. Double click the key WriteProtect in the right pane and set the value to 0 in the Value Data Box and press OK button

4. Exit Registry, restart your computer and then again re-connect your USB pen drive on your computer. That is it, done.

If you don't find StorageDevicePolicies key in the registry, the best way is to create it yourself. Below is the procedure.

Start the Registry Editor Go to the HKEY_LOCAL_MACHINE \ SYSTEM \ CurrentControlSet \ Control key

If there is no key called StorageDevicePolicies, create it.

You do this by right-clicking the HKEY_LOCAL_MACHINE \ SYSTEM \ CurrentControlSet \ Control key, and selecting New > Key from the menu.

Select the StorageDevicePolicies key

From the menu select Edit > New > DWORD Value

Name the new value WriteProtect

Right-click the WriteProtect value and choose Modify

In the Value Data: box enter 1

Exit the registry editor, and restart your computer

To reverse, just delete the new WriteProtect value (or set the value to 0) and restart the computer.

Solution 5:
If the above method does not work for you, follow the below steps:

1. Copy all the important data from this drive to your computer because this method will format the drive and erase all the data on the pen drive.

2. Now download the Apacer Formatting Utility Download Here , Unzip this utility to a folder. Keep your pen drive plugged in, and double click on the Start.bat file in the folder where you unzipped the above utility. This will start formatting your pen drive, wait till the formatting completes and the LED on your pen drive stops blinking. Remove your pen drive after than and plug it in again.

The above two steps will solve the problem. If you still face the problem, follow the below steps:

1. Goto Start > Run, type cmd and press enter, this will open command prompt.

2. Type the following command on the command prompt replacing X with the drive letter of your pen drive.

CHKDSK X: /F

The above two methods will help you fix the problem.

Note: For all those who are out of luck in fixing the problem with their portable drives, I would suggest you to get your drives checked or replaced by the manufacturer to fix it for you

Solution 6:
BUT if none of the methods listed above solves your problem then your pen drive might have gone corrupted, so just get it replaced.

How to make USB storage devices totally useless without your permission?

Today I am going to show you how you can make USB storage devices totally useless without your permission. To block all the storage device in your Windows, run registry editor by typing regedit in RUN command. In the registry editor, at left side navigation pane, navigate to following location:


HKEY_LOCAL_MACHINE > SYSTEM > CurrentControlSet > Services > USBSTOR

Now at the right side double click on START.


To block USB storage Medias, change the value data to 4.


If you want to unblock USB storage Medias just navigate to the same location and change th value data to 3.

How to format USB Drive & Memory Stick with NTFS?

If you have ever tried to format a USB thumb drive or memory stick, you may have noticed that the only options you get are FAT and FAT32 file systems. This is the default behavior in Windows XP. However, with some slight tweaking of settings, you can actually format your removable storage devices in NTFS format, including external hard drives, etc.

Of course, there is a reason why Windows defaults the formatting of removable storage to FAT and FAT32. There are actually a few advantages and disadvantages to formatting a USB drive in NTFS format, so we’ll go through those before actually talking about how to do it.

The advantages of enabling NTFS of removable storage devices are mostly security related. For example, an NTFS file system lets you to add allow and deny permissions on individual files and folders for specific Windows users, something you cannot do in the FAT file system. But that’s not all in terms of security. You can also encrypt files using Windows XP’s built-in encryption.

Other benefits include the ability to compress files and therefore save space on your USB drive. You can also set disk quotas and even create partitions! Formatting USB drives in NTFS has several advantages that would be good if you need to use some of these advanced features, i.e. for your IT department or if you’re just paranoid!

However, there are also a few drawbacks to using NFTS on a USB drive. Firstly, there is a lot more writing to the drive that is required when using NTFS and therefore your access to the device will be slower. Will it make a major difference that would prevent people from using it? Probably not, but it’s something to consider. Also, versions of Windows older than 2000 cannot read NTFS file systems, nor can most Linux systems.

The other major downside is that if you encrypt your files on the USB drive, you will not be able to open them anywhere else. Actually, this can be considered a downside or an upside depending on what you want to do. If you want to secure your USB stick so that only your user account on your one computer can open the files, then encrypting is perfect. If not, then do not encrypt the files.

How to format USB drive with NTFS?

First, connect your USB device to your computer. Then right-click on My Computer from the desktop and choose Manage.

Next click on Device Manager and then expand out Disk Drives. You should see your USB drive listed there as “Generic USB 2.0 USB Drive” or something similar.


Now right-click on the USB drive under Disk Drives and choose Properties. Then go to the Policies tab.


Now you will see two options, the “Optimize for quick removal” selected by default. Go ahead and change that by selecting the Optimize for performance option. This enables writing caching on the drive and therefore allows you to format it as NTFS! Sweet.


That’s it.

Now click OK and then go to My Computer. Right click on the drive in My Computer and choose Format. In the File System drop down you will now see the option for NTFS!

You can now secure your USB flash drive or external USB hard drive in any way you like! Enjoy!


Source: google.com