Showing posts with label Tips n Tricks. Show all posts

Tuesday, June 12, 2012

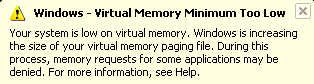
Solution to "Your System Is Low On Virtual Memory" Problem.

I’m going to tell you how to resolve this problem in Windows XP and Windows 7.
 
Most people know how to fix this problem inside of Windows XP, as under Windows XP, it’s well documented on many sites. The steps are quite simple: 
  • Click Start, right-click My Computer, and then click Properties.
  • In the System Properties dialog box, click the Advanced tab.
  • In the Performance pane, click Settings.
  • In the Performance Options dialog box, click the Advanced tab.
  • In the Virtual memory pane, click Change.
  • Change the Initial size value and the Maximum size value to a higher value, click Set, and then click OK.
  • Click OK to close the Performance Options dialog box, and then click OK to close the System Properties dialog box. 

For Windows 7 follow these steps: 
  • Open Computer up and hit the System Properties button, or Right Click on computer and hit Properties, or even still, go to the Control Panel and open the System button
  • Then on the left hand side, there’s a button marked Advanced System Settings
  • On the popup that opens, make sure you’re on the Advanced tab, then hit the button marked Settings under the Performance subsection
  • After that, hit the Advanced tab on that new popup, then hit the Change button for the Virtual Memory sub-section
  • Finally, once here, uncheck the “Automatically Manage Paging” option and increase the size manually. 
Note: If you reduce your page file because you want to regain space, you will run into fatal errors and things acting up. If you are not having any problems with Virtual Memory, DO NOT TOUCH IT.

How to hide a partition in Windows XP ?

Method 1:
1. Download and install TweakUI from Microsoft, or one of these links: MegaUpload 1 / MegaUpload 2

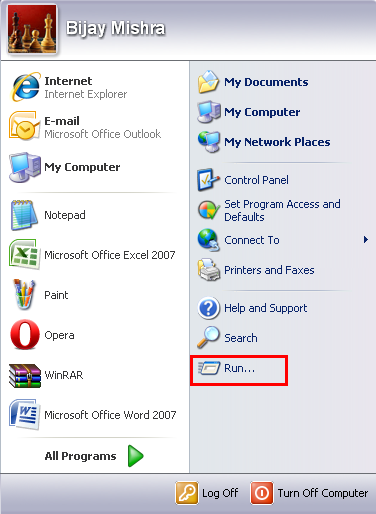
2. Go to Start -> run, type tweakui and press OK

3. In TweakUI go to My Computer -> Drives and uncheck the partition you want to hide

Method 2:
The second method would be with Hide Folders XP, you can find it HERE
1. Download it, install it, run it, register it

2. When you run it, i think it's gonna ask for a password, after you set the password press Add, select the partition (or the folder) you want to hide and press OK

3. Now right click on it in the list and check one of the options:
- Hide object
- Lock object
- Hide and lock object
- No object protection

4. Go to Tools -> Settings and do the following settings:
If protection is disabled on quit: select Enable protection
Check Ask password when uninstall
In the Advanced tab, check Protect files and folders in Windows Safe Mode
In the Startup tab, check all the options

5. Press OK and restart

Hidden Bluetooth Service in Windows XP and Vista

This Bluetooth service trick is an old one, but still many people are not aware that it exists in both Windows XP and Vista. So I am just publishing for my blog readers who still don't know this trick.

Most of us would either buy or download a software which would allow our Bluetooth Dongles or Bluetooth devices to communicate from the PC to mobile phones. However, with this trick, no longer need to search for a software in internet. Don't worry there is a hidden blue tooth software in Windows XP and Vista.

This is how it runs:

1. Click on Start, then on Run.


2. Now type 'fsquirt' without quotes. This will open a window with text Welcome to Bluetooth File Transfer Wizard.


3. Clicking on Next will then allow you to either send or receive a file.


4. Now just select whether you want to send or receive any file and you are done. And Click Next


5. Now You can Select Where you want to send the file or receive the file from depending on your selection from  above


NOTE: Some Bluetooth devices however require special drivers to work properly and these drivers are either supplied along with the devices or need to be downloaded. The Windows Bluetooth service nevertheless works with nearly most of the devices available on the market.

How To Fix Blue Screen of Death in Windows 7 ?

Computer errors have become an irritation for so many people now. One of the most common asked questions is how to fix windows 7 blue screen of death (BSOD).


The problem happens when the computer screen becomes blue. All the working computer programs are stopped in between. This error is such a huge problem for people because all the programs stop working. On top of it, any unsaved work is lost forever. Therefore, the users have to do their best to get rid of such blue screen errors.

Compared to Windows XP & Vista, BSOD aka blue screen of death annoyance is very less with Windows 7 but that does not mean Windows 7 is full proof to BSOD error. Recently Microsoft has noted Windows 7 may crash with blue screen of death error for no apparent reason followed by error message “STOP: 0×0000000A.”


Computer running Windows 7 occasionally crashes after it runs for some time. You receive a Stop error message with blue screen. The Stop error message resembles the following: STOP: 0×0000000A (parameter1, parameter2, parameter3, parameter4) IRQL_NOT_LESS_OR_EQUA

The biggest flaw in Windows 7 in my opinion was the frequency of Blue Screen Of Death when a USB device was unplugged without ejecting it from Windows. It was like if someone using Windows XP would come to the person using Windows 7 and plugged in his USB drive and then he would hurriedly unplug his USB drive without knowing that it would crash the Windows 7.

The error codes on Blue Screen of Death are usually 0x0000007E and 0×00000050. Fortunately the hotfix for fixing this issue is available with Microsoft now. To see the details about this error message go to this Microsoft article KB979538.

Download the hotfix from the following location:

Hotfix for KB979538

Download Fix302249 for Windows 7/Windows Server 2008 R2.

Monday, June 11, 2012

How To Identify Unknown Devices In Device Manager ?

We see that while installing Windows operating system on a new computer, there are devices which are not installed automatically and these devices show up as unknown devices in Device Manager in Windows and display a yellow exclamation mark.These devices need device drivers to work properly and we need to install them.

There are free tools which will directly suggest drivers for these devices, these tools includes: 3D Chip, Driver Easy, etc but in many cases these tools don’t work because they don’t cover all devices. To identify such unknown devices, follow these simple steps :

1. Press “Windows Ker + R” or Start > Run to launch Run Prompt. At the Run Prompt, type “devmgmt.msc” and press enter to launch Device Manager.

2. On Device Manager Screen, Locate the unknown device with yellow Exclamation mark, right click on it and click Properties.

3. On Device Properties Window, click on Details tab and select Hardware Ids from the drop down menu option.

4. On the Hardware Ids screen, note down the VEN and DEV ids of this unknown device. VEN is the vendor id and DEV is the device id. Combination of these two can identify a device very accurately.

5. Open the website "www.pcidatabase.com", this website contains an exhaustive database of PCI device manufacturers and devices. At this website, enter the VEN code and search the vendor name.

6. The search results will show you the vendor name. Now click the vendor name link to see the devices by the vendor and locate your device there.

7. Click the device name, it takes you to the devices page for this vendor. Once you know which device is it, you can got to the manufacturer’s website and download the required device drivers and install them manually.

This type of device search is very useful when the plug and play drivers are not present and you are not sure which device is there on the unknown list.

How To Solve Windows 7 Laptop Battery Charging Problem?

A quick check of many laptops will show that batteries usually have a warranty of 12 months, which is about the length of time when statistically we expect to see noticeable degradation. Those of us that have owned the same laptop for a couple of years and taken it through regular charge cycles have no doubt felt the decline in battery life.

Windows 7 makes use of a feature of modern laptop batteries which have circuitry and firmware that can report to Windows the overall health of the battery. This is reported in absolute terms as Watt-hours (W-hr) power capacity. Windows 7 then does a simple calculation to determine a percentage of degradation from the original design capacity.

In Windows 7 we set a threshold of 60% degradation (that is the battery is performing at 40% of its designed capacity) and in reading this Windows 7 reports the status to you. At this point, for example, a battery that originally delivered 5 hours of charge now delivers, on average, approximately 2 hours of charge. In Windows 7 the notification is a battery meter icon and notification is with a message of “Consider replacing your battery”. This notification is new to Windows 7 and not available in Windows Vista or Windows XP.
The message may also shows up on your laptop saying : “Consider replacing your battery. There is a problem with your battery, so your computer might shut down suddenly.”

So what is the serious issue behind this problem?
The most common complaint seems to be that battery life which used to last between 1.5 hours and 2 hours, is now less that 30 minutes. Some users at the forum are down to 15 minutes of battery life time.

Indeed, some users have complained that their batteries have been permanently damaged by the drainage problems.

Other problems reported are that the laptop will suddenly go into hibernate mode without warning.

A Simple Solution:
Setup Critical battery action to ‘Do Nothing’. Use the powercfg.exe tool. Essentially change the settings to “do nothing.” Here is how to do that:
  • Activate the power scheme you want to modify.
  • Open an elevated command console (windows key, type ‘cmd’ in start menu, press “ctrl+shift+enter”, click ‘continue’)
  • Execute “powercfg -setdcvalueindex SCHEME_CURRENT SUB_BATTERY BATACTIONCRIT 0″
  • Your current power scheme will show “Battery->Critical battery action->On battery: Do nothing” despite the option being unavailable in the drop box.
Note that your battery drainage will still occur, but the messages will not appear.

Next Solution: Calibrate the Battery
Follow these steps:
  • Fully Charged Up the Laptop Battery to 100 % , then unplugged power cable, and I let the battery drain. Upon reaching 99 % drainage you will start to get the message … consider replacing.
  • When the battery is fully drained, laptop goes into hibernate. Power it back on but then it shutdowns completely.
  • Checked Bios to confirm if there was any power was left; it had 2 % left.
  • Wait 15 minutes to completely drain the laptop of any battery power and confirm that it can not be powered on.
  • Remove the battery; then in this condition while the battery is out press the power button this will drain the system of any power left in the laptop.
  • At this stage the laptop should be fully drained now.
  • Plug in the A/C adapter cable to the laptop and wait 5 minutes. Power up the laptop.
  • Under this process while charging the laptop you should not get the error message.
This process should allow you to restore your battery to it’s optimum level.

How To Fix USB Device Stops Responding or Copying Error on Windows 7 / Server 2008 R2

 One of the main reported troubles with Windows 7 and Windows Server 2008 R2 is the freezing problem - windows get freezes occasionally on copying files to USB Drives. The main issue is that the freezing is unpredictable, it occurs randomly. After freezing mouse, keyboard may not work, the only option is power off or reset. The problem is common for both 32 and 64 bit systems.

Case: You try to copy data from the computer to an external USB storage device. In this scenario, either of the following issues occurs:
  • The computer stops responding.
  • The copy operation stops.
If your Windows 7 or Windows Server 2008 R2 consistently freeze or crash when copy files to USB hard disk or USB flash drive, download and apply the latest Microsoft Hotfix filed under article ID 976972 might be the solution. However, this KB976972 hotfix only applicable to computer that uses:
  • Running Windows 7 or Windows Server 2008 R2.
  • Has an NVIDIA USB Enhanced Host Controller Interface (EHCI) chipset.
  • Has at least 4GB of RAM.
An error may occur when user tries to copy data from the computer to an external USB storage device. When copying data or files and folders from PC to an USB storage devices such as USB flash drive, portable hard disk drive, or any USB devices, the copy operating may stop without completing or before done copying, or worse, the computer may stop responding. The issue may occur if there is any input/output (I/O) operations on the USB storage device, where the I/O operations fail.

Microsoft has identified that problem in KB976972, and has released hotfix to resolve the issue, which can be downloaded for free from Microsoft Download Center.

Download:
For (x86 or 32-bit): Windows6.1-KB976972-x86.msu

For (x64 or 64-bit): Windows6.1-KB976972-x64.msu

Friday, May 18, 2012

How to Disable and Turn Off Aero Peek at Desktop in Windows 7 ?

Whenever there is Aero enabled in Windows 7, the Aero Peek feature which we know as Desktop Preview, will be enabled and turned on. When the open windows are hidden, only outlines or borders of all windows are shown, allowing users to peek behind all open windows to see the desktop. 
 
For Windows 7 users who don’t need the Aero Peek feature, here’s how to disable and turn off Aero Peek. 
  • Right click on blank space on Taskbar, and click Properties.
  • In the “Taskbar and Start Menu Properties” dialog, make sure that Taskbar tab is selected.
  • Uncheck or untick the Use Aero Peek to preview the desktop option.
  • Click OK or Apply.
 It’s also possible to turn off and turn on Aero Peek via Show Desktop button bar: 
  • Right click on the Show Desktop small rectangle button on the far right end of the Windows 7 Taskbar.
  • Click on Peek at desktop option on the context menu so that the tick next to it disappears to disable Aero Peek.
  • Alternatively, follow these steps:
  • Go to Control Panel -> System and Security -> System, and click on Advanced system settings link on the left pane.
  • In “System Properties” dialog box, make sure it’s on Advanced tab.
  • Click on Settings button under Performance section.
  • In “Performance Options” dialog box, make sure it’s on Visual Effects tab.
  • Untick and uncheck the Enable Aero Peek option. 

Note: System will automatically select “Custom” radio button, if the advanced configuration has never been customized before.
  • Click OK or Apply.

Tuesday, May 15, 2012

How To Fix RPC Server Unavailable Error ?

Have you gotten an RPC error lately? Something like these:
- "RPC Server is Unavailable"
- OR "The RPC Server is too busy to complete the task"

Unfortunately, an RPC error is one of the most common errors out there, and most of us don't even know what RPC is.

What is RPC?
RPC stands for "Remote Procedure Call." This probably still doesn't tell you much. Let's see if we can put this in non-technical language. RPC is the go between of your computer and server. This is what allows your computer to access a network.

RPC has two main parts to it: the client and the server. When the client (the program requesting something) sends a message to the server (the process that takes the order or performs the task), it is being asked to execute a certain procedure. The client waits for the server to process the call before resuming the execution.

Why Won't the RPC Server Work?
Usually, the RPC error pops up because there is some sort of miscommunication between the computer and the server. Most of the time, the wires get crossed somewhere due to Internet components that are not configured or activated. Sometimes it is just a matter of adjusting the Internet Firewalls or Proxy Server.

Quick RPC Error Fix
One way to investigate an RPC server error is to verify that you have enabled the DCOM Tunneling is enabled and not being blocked by any third party Internet Security programs such as AVG, Norton, McAfee, etc.

To do this:

1. Go to Start and Run
2. Type in DCOMCNFG
3. Click on Component Services
4. Click on Computers
5. In Computers, right click My Computer
6. Choose Properties
7. Go the Default Properties tab
8. Check the "Enable DCOM" tab
9. Go to the Default Protocols tab
10. Click Add
11. By the Protocol Sequence move the down arrow to Tunneling TCP/IP
12. Click OK
13. Click MoveUp button until Tunneling is at the top of the list
14. Now you may select SPX and Remove
15. Click OK or close the program out
16. Restart the computer

Fixing Folder Options Problem in Windows XP

If you are running Microsoft Windows XP and unable to access your hidden files and folders or unable to locate folder options menu in Windows Explorer than most probably your computer is infected by some malicious virus (w32.rontokbro@mm) activity.

The virus blocks the process of registry updating of Windows XP and creates a false entry in registry to actually disable the Folder Options in Windows Explorer or make some of its functionalities to work improperly including hidden files and folders.

However, you can easily fix this problem by some basic editing in the Windows XP registry. I have listed couple of methods in the lines below to overcome the Folder Options Problem in Microsoft Windows XP.

Method A: Restore Folder Options Menu:
(1) Go to Start -> Run
(2) Type “regedit” in the text box and click “OK”
(3) In the registry editor, navigate to following registry key:

HKEY_CURRENT_USER -> Software -> Microsoft ->Windows ->Current Version -> Policies -> Explorer

(4) Double click “NoFolderOptions” on the right-hand side menu, and change the value to “0″.

(5) It's Done! Close the registry editor and restart your computer.

If you don’t want to play with the registry yourself ,you can also download the registry file and double click it to add it to the registry from HERE

Method B: Fix Hidden Files Problem:
(1) Go to Start -> Run
(2) Type “regedit” and click “OK”
(3) In the registry editor, navigate to following registry key:

HKEY_LOCAL_MACHINE -> Software -> Microsoft -> Windows -> CurrentVersion -> Explorer -> Advanced -> Folder -> Hidden -> ShowAll

(4) Delete “CheckedValue” on the right hand side menu
(5) Create a new key “CheckedValue” as a DWORD (hexadecimal) with value 1.

It's Done! Show hidden files and folders option should now work properly.

Method C: Fix Folder Options Missing Problem:

(1) Go to the Start Menu and open the run.
(2) In the Run Type "gpedit.msc" (Without quotes) and press enter.
(3) Now you will see Something like this:
(4) Now Go to User Configuration>Administrative Templates>Windows Component>Windows Explorer.
(5) Click on Windows Explorer you will find the 3rd option on the right side of screen "Removes the Folder Option menu item from the Tools menu".

(6) Just check it, if it is not configured then change it to enable by double clicking on it and after applying again set it to not configured.
(7) I hopes that you will find the option after restarting windows.

How To Save C Drive Space After Installing Updates on Windows XP ?

If you are thinking to delete the Hot-fixes from Add Remove Programs to save space on C Drive after you install windows updates or Service Pack on Windows XP, than listed down are files and folders which you can safely delete from your system drive in order to get more free space.


1. You do not want to delete/uninstall the Hotfixes, if they are still listed, they are most likely current and valid. If you delete the Hotfixes you also remove the protection/enhancement they provide. However you can safely delete the uninstall files. Once you are sure you will keep the Windows XP Service Pack, it is safe to delete the uninstall files.

2. The files may be hidden, to show the file:
Go to C:\WINDOWS
Click the top TOOLS, click FOLDER OPTIONS, click VIEW
Check the radio button. "Show hidden files and folders"
Click OK and you should now see more files.

3. Go to C:\WINDOWS and delete "$NTServicePackUinistall$" about 240 mb.
Then go to Add/Remove Programs.
Click "Service Pack 1"(2), there will be an error since you just deleted the file.
Click YES to delete the shortcut.

4. Use similar procedure to delete uninstall files for the updates. The updates will be in this format "$NTUninstall********"
Do NOT delete "$hf_mig$"

5. The file "C:\Windows\SoftwareDistribution\Download" may also be safely deleted. Depending on installation method of the service Pack, this file may not be present.

6. Do NOT delete "C:\Windows\ServicePackFiles". That file may be needed if you have problems later and sometimes for hardware installations.

It is used by Windows File Protection as a backup for system files. Some who really need the space burn this file to CD, or compress the file but if space is that important a larger or second hard drive is the better fix.

Sunday, May 13, 2012

How To Prevent Cyclic Redundancy Check Error in Windows ?

Cyclic redundancy check (CRC) is an error message that appears on the computer screen whenever your PC reads corrupt data. CRC, basically detects an error in the file that is being read by your PC. This error message commonly occurs when your PC attempts to read data from a damaged storage media, such as a hard drive, CD or a DVD. When data is being transferred to the PC, cyclic redundancy check ensures that data with numerous errors does not reach the specified destination. This is the reason why a corrupted CD does not get copied onto your computer.

 
A file that is not properly downloaded from the Web or an interrupted file transfer can also lead to CRC errors. So before you open the file, check whether it has been downloaded completely. You can use a download manager while downloading to fix cyclic redundancy check error. A download manager application keeps a track on the downloading process and informs you when it is complete. Or else, you can again attempt to download from the start and check whether it still occurs.
 
In case you are copying the file from your hard drive, you may have to run a scan disk program to troubleshoot errors related to the hard drive. Defective connections between the computer and the hard drive causes popping up of CRC message on the screen. For fixing CRC errors related to networking issues, you need to verify all the connections to decode the problem.
 
Cyclic redundancy check error can appear due to other reasons too. Although a failing drive or a damaged CD are the common culprits behind the occurrence of this error, some other unavoidable circumstances listed below may cause this problem.
  • Incomplete downloads
  • System crash
  • Buggy software (applications with plenty of bugs)
In such cases, the system may display messages like 'An invalid Windows file or an invalid win32 application'. But it is actually a CRC error.
 
If the problem is CD related, then cleaning it can solve the CRC error but if it the same case with most disks, then it must be your hardware issue. Another cause of the problem might be the discs that were burnt poorly (with several buffer under runs).
 
But if the problem is due to internal damage, then you need to download Jfile Recovery software which is the right choice to correct CRC errors. Please note that you have to have Java on your system if you want to use the Jfile recovery. Its results are immediate and free!

How To Make Windows Start Faster In Local Area Network?

Whenever you start your computer, you are faced with a few moments of thumb twiddling while Windows boots and prompts you to log on. Although you should expect to wait for a few moments, sometimes Windows seems to boot rather slowly. In fact, you may notice that over a period of time the PC that used to roar to life seems a bit sluggish instead. Fortunately, you can perform several techniques that help Windows get the bootup speed you want.


When a PC is connected to Local Area Network, system follows update rules of Groups Policies during the startup. This causes the computer to starts up slowly and takes long time. To make logon faster these policies must be turned off so that computer does not waste its time in renewing the group policies.

This can be manually or automatically with a registry key.

Manual procedure:

1. Start the Registry Editor and navigate to HKEY_LOCAL_MACHINE -> SOFTWARE – > Microsoft -> Windows ->CurrentVersion -> Policies -> System
2. From the menu choose Edit -> New -> DWORD Value and give name of SynchronousMachineGroupPolicy
3. Double-click the new value and the field DataValue type 0and click OK
4. Create another DWORD value and name it asSynchronousUserGroupPolicy and put the value to 0.
5. Restart your computer.

Automatic Procedure:
Download the zip file below and double click at tweak.reg , to enable tweak, and if you want to restore your default settings you have to launch tweak_restoreand registry entries are removed.

Note: Be sure that this tweak should not be applied where group policies are required to be updated at each startup.

Download Registry Tweek from Here

Source: pcmag.com

How To Increase Virtual Memory In Windows XP?

Virtual memory is simulated RAM. When you have used up all your RAM, your computer will shift data to an empty space on the hard drive. The computer swaps data to the hard disk and back to your RAM as needed. When you increase your virtual memory you are increasing the empty space that is reserved for your RAM overflow.

Also having enough available space is absolutely necessary for your virtual memory and RAM to function properly.

How To change the size of the virtual memory paging file?
You must be logged on as an administrator or a member of the Administrators group in order to complete this procedure. If your computer is connected to a network, network policy settings may also prevent you from completing this procedure.

1.Open System in Control Panel.

2.On the Advanced tab, under Performance, click Settings.

3.On the Advanced tab, under Virtual memory, click Change.

4.Under Drive [Volume Label], click the drive that contains the paging file you want to change.

5.Under Paging file size for selected drive, click Custom size, and type a new paging file size in megabytes in the Initial size (MB) or Maximum size (MB) box, and then click Set.

If you decrease the size of either the initial or maximum page file settings, you must restart your computer to see the effects of those changes. Increases typically do not require a restart.

Note:

To open System, click Start, click Control Panel, click Performance and Maintenance, and then click System.

To have Windows choose the best paging file size, click System managed size.

For best performance, do not set the initial size to less than the minimum recommended size under Total paging file size for all drives. The recommended size is equivalent to 1.5 times the amount of RAM on your system. Usually, you should leave the paging file at its recommended size, although you might increase its size if you routinely use programs that require a lot of memory.

To delete a paging file, set both initial size and maximum size to zero, or click No paging file. Microsoft strongly recommends that you do not disable or delete the paging file.

Source: microsoft.com

How To Automatically Log On To Windows XP Upon Startup?

Would you rather not have to log on after your computer starts? If you’re the only person who uses your computer, you can make life a little easier by skipping the Welcome screen completely and having Microsoft Windows XP take you straight to your desktop.

Follow these Steps:
1.Click Start, and then click Run.


Note: Remember your user name at the top of the Start menu, because you’ll need it later.

2.In the Open box, type control userpasswords2 and click OK.


3.Clear the Users must enter a user name and password to use this computer check box. Click OK.


4.Click the User name box, type the user name that was displayed on the Start menu in step 1. If you normally type a password to log on, type your password in both the Password and Confirm Password boxes. Otherwise, leave these boxes blank. Click OK.


Auto logon now allows anyone to start and use your computer without typing a password.

Note: Keep in mind that you should not enable auto logon if you need privacy for any files on your computer.

Source: microsoft.com

How To Block Any Website Without Using Any Software?

Yes,that's true. You can block any website in windows without using any software. Just follow these steps:

1.Browse for C:\Windows\system32\drivers\etc.

Alternatively, Open “Run” from the start menu (or press WinKey + r). Just copy paste the following path and hit ENTER. notepad %windir%\system32\drivers\etc\hosts

2.Search for the file named "hosts" and open it in notepad.

3.Then you will see a line "127.0.0.1 localhost".

4.Just under this line add "127.0.0.2 www.sitenameuwanttoblock.com" without quotes and Change the www.sitenameuwanttoblock.com url with the site's url you want to block and you are done!!

For Example:-
127.0.0.2 www.facebook.com

5. Make sure every time you add another website, the last digit of the address 127.0.0.x should not be the same.

For Example:-
127.0.0.3 www.orkut.com

6. Save the file and exit. Restart your browser if it is opened and changes will take place immediately.

Note:
You may need to add sites with both with and without the "www.". Test after blocking to make sure you got it right.

You can add as many undesirable and dangerous sites as you wish to block in this fashion in your personal HOSTS file!

Some people suggest that you add a website address that you wish to block by adding it to Internet Explorer's Restricted Zone. This does NOT totally block a site. It will only RESTRICT a site from certain actions such as using javascript, Active-X and Java etc.

Some people also suggest that you add a website address to the Internet Explorer 'Privacy' settings. This does not block a site. It only stops that site from using cookies.

Source: elakiri.com

Friday, May 11, 2012

How To Auto Logon for Windows XP?

To automatically log on to Windows XP upon startup, Follow these precodeure

Step 1: Click Start, and then click Run.


Note: Remember your user name at the top of the Start menu, because you’ll need it later.

Step 2: In the Open box, type control userpasswords2 and click OK.


Step 3: Clear the Users must enter a user name and password to use this computer check box. Click OK.


Step 4: Click the User name box, type the user name that was displayed on the Start menu in step 1. If you normally type a password to log on, type your password in both the Password and Confirm Password boxes. Otherwise, leave these boxes blank. Click OK.


Auto logon now allows anyone to start and use your computer without typing a password.

Note: Keep in mind that you should not enable auto logon if you need privacy for any files on your computer. If you need to maintain privacy, create separate user accounts for everyone in your home, and protect your account with a password.

How to Update Facebook Status From Google Plus?

Google plus is the newbie in the market of social networking site. It is gaining the popularity in high speed, surely a big threat to the Facebook, who is leading in the race of competition.

A new Web browser extension called Google+Facebook inserts Facebook's social network right into your Google+ stream view, accessible through a new "Facebook" button at the top of the page. Although fun, the extension does need some work, if we're being honest. Google+Facebook is pretty basic right now. All it does is display your News Feed within the Google Plus interface. But to like or comment on any item, you have to click the link "view this post on Facebook." There's also no access to other Facebook features like Games, Events, Profiles, Friend Requests or Photo Albums.

Follow these steps:
  • Install the plugin (Download Link is provided at the end of the post!!)
  • It will ask for permission for accessing basic information from Facebook. Just allow it!!
  • You will need to connect with the Facebook to activate Google + Facebook.

  • Restart Browser
  • Go to Google plus.
  • Connect with Facebook.Start updating.
  • Click on "Whats on your mind"
  • Enter your Status in the new Window

  • Share and you can see the status updated from Google plus in the Facebook page....It shows "via Googleplus"

Note: The Google+Facebook extension is currently supporting Chrome and Firefox only. Due to https:// security level issues with Internet Explorer, Google+Facebook does not support IE. We are working on a fix for that.

Most of the people wants Google plus. If anybody need please ask me. I have invitations.

Download Plugin from Here

Source: crossrider.com

How to type with Nepali Unicode Upgraded Keyboard Layouts ?

To be able to type in unicode environment please follow the instruction :
- You'll see the following language in the task bar like follows :
- You can either click in the language in the language bar or press the ALT + SHIFT to switch between the languages.

- After Clicking the Sanskrit , the Nepali Unicode Environment is enabled. In the language bar ,now Enligh langauge(EN) environment has been changed in to Sanskrit or Devnagari Script (SA ).

If more than one unicode environment is installed like Nepali Unicode traditional and Nepali Unicode Romanized, first you have to follow the above instruction. When you can see the Devnagari Script (SA) has been enabled, now you can switch to any of the Installed Nepali Unicode environment .

- Click the keyboard icon on the language bar when SA being enabled. You'll see the following if you have installed more than one Nepali Unicode Environment Installed:

- Please click anyone of the unicode environment to enable to type in selected unicode environment. Suppose if you click Nepali Unicode Romanized, now you can use the selected language keybaord layout.

- Typing style in both environment is same.The only difference is in keyboard layout. The typing style in Nepali Unicode (Romanized) has been simplified for English User to type Nepali easily.

Some minor changes have been made in the upgraded Nepali Unicode Keyboard Layouts. These changes are demonstrated with explanations below.

Changes or Updates in the Romanized Keyboard Unicode Layout

The typing style in Unicode Environment differs from the traditional style in non-unicode environment

Changes or Updates in the Traditional Keyboard Unicode Layout

The '+' key in your keyboard is used as a Zero Width Non-Joining character while '=' key work as a Zero Width Joining character.

New characters in Traditional Layout
1. Comma , = Ctrl + ,
2. Less than < = Ctrl + Alt + <
3. Full stop . = Ctrl + .
4. Greater than > = Ctrl + Alt + >
5. Slashes / = Ctrl + /
6. Semi colon ; = Ctrl + ;
7. Colon : = Ctrl + Alt + :
8. Single Inverted ' = Ctrl + '
9. Double Inverted " = Ctrl + Alt + "
10. Large bracket open [ = Ctrl + [
11. Large bracket close ] = Ctrl + ]
12. Curly Bracket Open { = Ctrl + Alt + {
13. Curly Bracket Close } = Ctrl + Alt + }
14. Small Bracket Open ( = Ctrl + Alt + (
15. Small Bracket Close ) = Ctrl + Alt + )
16. Dashes - = Ctrl + -
17. Plus + = Ctrl + Alt + +
18. S lashes \ = Ctrl + \
19. Pipe | = Ctrl + Alt + |
20. Underscored _ = Ctrl + Alt + _
21. Equal to= Ctrl + =

Nepali language conjuncts::
You may need to know the different forms of Nepali language conjuncts before we show you how to type in Unicode environment.Two Unicode special formatting control characters play an important role in representing the different forms of Nepali language conjuncts:

1. 'zero-width joiner' (ZWJ)
2. 'zero-width non-joiner' (ZWNJ)

1. A Zero Width Joiner (ZWJ) is typically used to fuse two characters that normally do not form a ligature or a fused form.

2. A Zero Width Non Joiner (ZWNJ) is typically used to represent the separated form of characters that normally fuse together to form a ligature.

In the context of Nepali, the halant representation has an implicit behavior similar to zero-width joiner.

The ZWJ and ZWNJ, among other things, can be used to represent different forms of conjuncts as shown in the following example:

The ZWJ and ZWNJ, among other things, can be used to represent different forms of conjuncts as shown in the following example:

The ZWJ following the consonant+halant sequence (‘ka’+ halant in the example) represents the half-consonant form of the syllable (‘ka’ in the above example). The ZWNJ, on the other hand, is used in representing the split or separated form of the conjunct. When neither the ZWJ nor the ZWNJ appears following the halant character, the conjunct is shown in the customary full ligature form.